Kubernetes Cluster in AWS with Kops
Introduction
Kubernetes is a platform for deploying and managing containers. It is production-grade, open-source infrastructure for the deployment, scaling, management, and composition of application containers across clusters of hosts. It provides a container run-time, container orchestration, container-centric infrastructure orchestration, self-healing mechanisms such as health checking and re-scheduling, and service discovery and load balancing. It is is primarily targeted at applications composed of multiple containers. It therefore groups containers using pods and labels into tightly coupled and loosely coupled formations for easy management and discovery.
The motivation for using Kubernetes (k8s) for container service clustering, apart from the said above, is to provide a mature, stable and production ready platform that can be deployed on private and public cloud and bare metal servers as well. As an open-source project it has a massive community contributing and extending its functionality in numerous ways, from add-ons and plug-ins to various deployment tools and forked projects.
Architecture
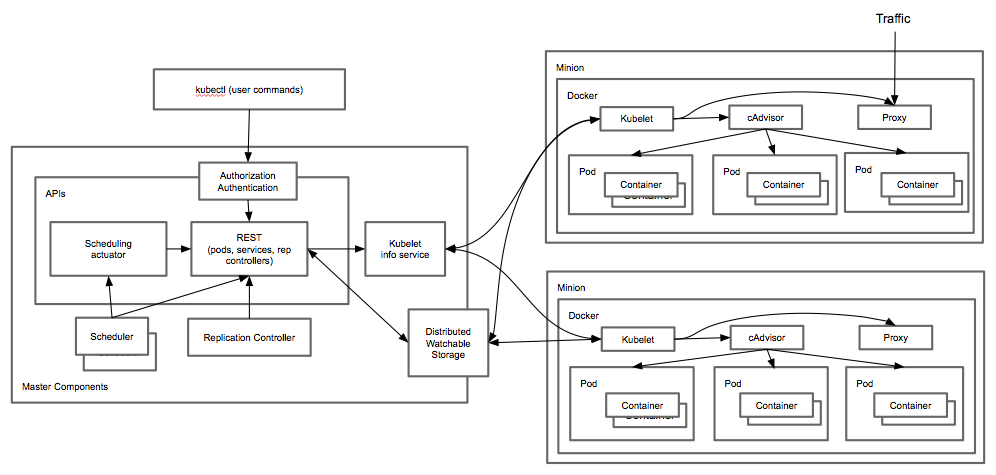
The below high level architecture diagram depicts all the components that comprise a Kubernetes cluster:
 Picture1: Kubernetes architecture diagram
A running Kubernetes cluster contains node agents (kubelet) and a cluster control plane (master), with cluster state backed by a distributed storage system (etcd). In terms of component distribution, the control plane components usually run on a single node (or multiple nodes to achive High-Availability) which we call Master(s) and the services necessary to run application containers managed by the master systems are installed on nodes called Minions (or Workers in the most recent terminology). The distributed storage system can reside on its own cluster of nodes but usually it shares the same nodes as the cluster control plane ie the Masters.
Short description of the components is given below.
Cluster control plane (Master)
The Kubernetes control plane is split into a set of components, which can all run on a single master node, or can be replicated in order to support high-availability clusters, or can even be run on Kubernetes itself.
API Server
The API server serves up the Kubernetes API. It is intended to be a relatively simple server, with most/all business logic implemented in separate components or in plug-ins. It mainly processes REST operations, validates them, and updates the corresponding objects in etcd store.
Cluster state store
All persistent cluster state is stored in an instance of etcd. This provides a way to store configuration data reliably. With watch support, coordinating components can be notified very quickly of changes.
Controller-Manager Server
Most other cluster-level functions are currently performed by a separate process, called the Controller Manager. It performs both lifecycle functions and API business logic (eg. scaling of pods controlled by a ReplicaSet). The application management and composition layer, providing self-healing, scaling, application lifecycle management, service discovery, routing, and service binding and provisioning.
Scheduler
Kubernetes enables users to ask a cluster to run a set of containers. The scheduler component automatically chooses hosts to run those containers on. The scheduler watches for unscheduled pods and binds them to nodes via the /binding pod sub-resource API, according to the availability of the requested resources, quality of service requirements, affinity and anti-affinity specifications and other constraints.
The Kubernetes Node
The Kubernetes node has the services necessary to run application containers and be managed from the master systems.
Kubelet
The most important and most prominent controller in Kubernetes is the Kubelet, which is the primary implementer of the Pod and Node APIs that drive the container execution layer. Kubelet also currently links in the cAdvisor resource monitoring agent.
Container runtime
Each node runs a container runtime, which is responsible for downloading images and running containers. Kubelet defines a Container Runtime Interface to control the underlying runtime and facilitate pluggability of that layer. Runtimes supported today, either upstream or by forks, include at least docker (for Linux and Windows), rkt, cri-o, and frakti.
Kube Proxy
The Service abstraction provides a way to group pods under a common access policy (e.g. load-balanced). The implementation of this creates a Virtual IP which clients can access and which is transparently proxied to the pods in a Service. Each node runs a kube-proxy process which programs iptables rules to trap access to service IPs and redirect them to the correct backends. This provides a highly-available load-balancing solution with low performance overhead by balancing client traffic from a node on that same node.
Service endpoints are found primarily via DNS.
Deployment
To deploy k8s cluster from scratch is not an easy task but there have been projects like Kops (Kubernetes Operations) and Kargo stemming from the Kubernetes project itself that aim to aid users on this subject. More information on how are these two projects different can be found here https://github.com/kubernetes-incubator/kargo/blob/master/docs/comparisons.md. Some other tools worth mentioning here are kube-aws and Tectonic from CoreOS which is free for up to 10 nodes after which requires annual subscription and OpenShift Origin which is the community release of the commercial OpenShift by RedHat. All of them have their own pros-and-cons and some of them are more AWS oriented than others or have different configuration platform ie Terraform, CloudFormation or Ansible. The ones that I chose to use (for now) and had time to test are Kops and Tectonic being the easiest to use and start with. Although I liked Tectonic (it uses Terraform which is very convenient since thats the tool we use to provision our AWS VPC’s) I hit couple of road blocks, but was able to deploy fully functional k8s cluster and deploy container applications on it with Kops.
The task was to achieve production ready setup, so basically high-availability, scalability and self-healing on node and service level are required. The k8s cluster will also need to incorporate into existing VPC created by Terraform. This is the expected road map for moving parts of our app to microservices; they will need to run in our existing VPC infrastructure and cooperate with the existing services.
I will use a simple nodejs app I created for the POC and will deploy k8s in existing VPC created via our Terraform repository. Before we start I’ll quickly go through some basic terms in the Kubernetes terminology:
Pod: A Pod is the smallest unit of computing in Kubernetes. It is a group of containers running in shared context.ReplicaSets: A ReplicaSet ensures a specific number of pod replicas are always up and running. While ReplicaSets are independent entities, they are mainly used by Deployments as a mechanism to orchestrate pod creation, deletion and updates.Deployment: A Deployment can be thought of as an abstraction containing Pods and ReplicaSet.Service: A Service defines a logical set of Pods and a policy by which to access them. The set of Pods targeted by a Service is determined by a Label Selector (defined in Service’s YAML file).
Kubernetes and Kops Cluster
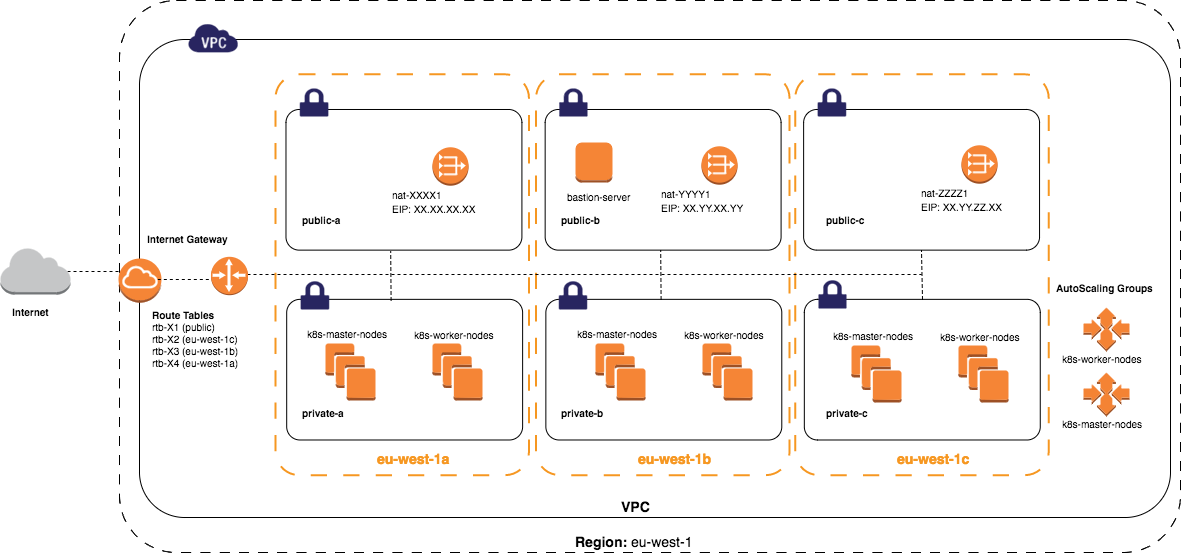
The following image should depict the build of the k8s cluster via Kops.
 Picture2: Kubernetes cluster in private AWS subnets across multiple zones
Good starting point for Kops on AWS is the documentation page in Git: Getting Started. Following the instructions we first install kubectl on our local station, the basic configuration tool for Kubernetes:
$ curl -LO https://storage.googleapis.com/kubernetes-release/release/$(curl -s https://storage.googleapis.com/kubernetes-release/release/stable.txt)/bin/linux/amd64/kubectl
$ chmod +x ./kubectl
$ sudo mv ./kubectl /usr/local/bin/kubectl
$ source <(kubectl completion bash) # setup autocomplete in bash, bash-completion package should be installed first.
Kops installation is next, using Kops-1.5.3 in my case:
$ curl -sLO https://github.com/kubernetes/kops/releases/download/1.5.3/kops-linux-amd64
$ chmod +x kops-linux-amd64
$ sudo mv kops-linux-amd64 /usr/local/bin/kops
Then we create S3 bucket for Kops configuration storage:
$ aws s3api create-bucket --bucket encompass-k8s-kops --region eu-west-1 --create-bucket-configuration LocationConstraint=eu-west-1
$ aws s3api put-bucket-versioning --region eu-west-1 --bucket encompass-k8s-kops --versioning-configuration Status=Enabled
$ aws s3 ls
in the same region as our cluster. Next is the Kops YAML configuration file. We can choose variety of options like deploying the k8s cluster in new or existing VPC, the VPC network CIDR, private or public subnets, private or public DNS zone, Kubernetes version and CNI (Container Network Interface) network plugin, SSH key for the admin user (to access the nodes), etc. Then running the following script:
#!/bin/bash

# Source our aws environment
[[ -f ~/ec2/aws.conf ]] && . ~/ec2/aws.conf

export NAME="tftest.encompasshost.internal"
export KOPS_STATE_STORE="s3://encompass-k8s-kops"
#export KOPS_FEATURE_FLAGS="+UseLegacyELBName"
#export KOPS_FEATURE_FLAGS="+DrainAndValidateRollingUpdate"
export VPC_ID="vpc-xxxxxxxx"
export NETWORK_CIDR="10.99.0.0/20"
export ZONES="eu-west-1a,eu-west-1b,eu-west-1c"
export SSH_PUBLIC_KEY="~/ec2/.ssh/ec2key-pub.pem"
export ADMIN_ACCESS="[${NETWORK_CIDR},210.10.195.106/32,123.243.200.245/32]"
export DNS_ZONE_PRIVATE_ID="ZXXXXXXXXXXXY"
export DNS_ZONE_ID="ZXXXXXXXXXXXXI"
export NODE_SIZE="t2.medium"
export NODE_COUNT=3
export MASTER_SIZE="t2.small"
export KUBERNETES_VERSION="1.5.6"
kops create cluster \
    --name "${NAME}" \
    --cloud aws \
    --kubernetes-version ${KUBERNETES_VERSION} \
    --cloud-labels "Environment=\"tftest\",Type=\"k8s\",Role=\"node\",Provisioner=\"kops\"" \
    --node-count ${NODE_COUNT} \
    --zones "${ZONES}" \
    --master-zones "${ZONES}" \
    --dns-zone "${DNS_ZONE_PRIVATE_ID}" \
    --dns private \
    --node-size "${NODE_SIZE}" \
    --master-size "${MASTER_SIZE}" \
    --topology private \
    --network-cidr "${NETWORK_CIDR}" \
    --networking calico \
    --vpc "${VPC_ID}" \
    --admin-access "${ADMIN_ACCESS}" \
    --ssh-public-key ${SSH_PUBLIC_KEY}
will create the needed configuration, resources and k8s manifests and upload them in our S3 bucket.Then we can run:
$ kops edit cluster tftest.encompasshost.internal
to make custom changes via Kops that downloads the config from S3 and opens it for us inside a vim editor. After making all the changes though, like setting Kubernetes version to 1.5.6, we can create our own local YAML file and use it for the final stage to actually create the cluster.
Thanks to the output from Terraform when the VPC building stage had finished like:
private_subnets_2 = subnet-axxxxxxb,subnet-cxxxxxx0,subnet-cxxxxxxa
nat_gateway_ids = nat-0xxxxxxxxxxxxxxx0,nat-0xxxxxxxxxxxxxxxa,nat-0xxxxxxxxxxxxxxx8
public_subnets = subnet-axxxxxx8,subnet-cxxxxxx5,subnet-dxxxxxxf
populating the Kops YAML config template is not a difficult task (can be also included as part of the Terraform provisioner so the template is auto-generated). Then running:
$ kops update cluster --name=tftest.encompasshost.internal --yes
or if using local config file (mine as a template is available for download from here):
$ kops update cluster --config kops-tftest.yml --name=tftest.encompasshost.internal --yes
will finally create our k8s cluster. When --yes is omitted Kops will do a dry-run and print out all the changes that are going to be applied so we can go back and fix any errors.
For this cluster I’m using Calico CNI as it provides network policies as well. In case we need to use some other CNI plug-in like flannel or weave we need to leave networking to empty CNI in the template:
networking:
  cni: {}
and then when the cluster has stabilized (check with kops status) we deploy the CNI of choice, for flannel (developed by CoreOS):
$ kubectl create -f https://raw.githubusercontent.com/coreos/flannel/master/Documentation/kube-flannel-rbac.yml
$ wget https://raw.githubusercontent.com/coreos/flannel/master/Documentation/kube-flannel.yml
$ kubectl apply -f kube-flannel.yml
or weave:
$ kubectl apply -f https://git.io/weave-kube
# optional Scope dashboard for weave
$ kubectl apply --namespace kube-system -f "https://cloud.weave.works/k8s/scope.yaml?k8s-version=$(kubectl version | base64 | tr -d '\n')"
$ kubectl port-forward -n kube-system "$(kubectl get -n kube-system pod \
  --selector=weave-scope-component=app -o jsonpath='{.items..metadata.name}')" 4040
# and connect to it: http://localhost:4040
just to mention couple of most used overlay CNI networks/plugins. Just a quick note about above flannel files, the kube-flannel-rbac.yml should be applied for k8s-1.6.x versions which use RBAC by default. The Cluster Networking section of the official Kubrnetes documentation has more details on the networking subject.
Ok, so after Kops deployment has finished we can check the status of our k8s cluster we deployed in a existing VPC:
$ kops validate cluster --name=tftest.encompasshost.internal

Validating cluster tftest.encompasshost.internal
INSTANCE GROUPS
NAME            ROLE    MACHINETYPE    MIN    MAX    SUBNETS
master-eu-west-1a    Master    t2.small    1    1    eu-west-1a
master-eu-west-1b    Master    t2.small    1    1    eu-west-1b
master-eu-west-1c    Master    t2.small    1    1    eu-west-1c
nodes            Node    t2.medium    3    3    eu-west-1a,eu-west-1b,eu-west-1c

NODE STATUS
NAME                        ROLE    READY
ip-10-99-6-136.eu-west-1.compute.internal    master    True
ip-10-99-6-242.eu-west-1.compute.internal    node    True
ip-10-99-7-127.eu-west-1.compute.internal    master    True
ip-10-99-7-136.eu-west-1.compute.internal    node    True
ip-10-99-8-251.eu-west-1.compute.internal    node    True
ip-10-99-8-77.eu-west-1.compute.internal    master    True

Ready Master(s) 3 out of 3.
Ready Node(s) 3 out of 3.
and can see our 3 x Master and 3 x Worker nodes up and running.
Kops created a kubectl config under ~/.kube/config file once we have a running cluster. Mine looks like this (certs truncated):
apiVersion: v1
clusters:
- cluster:
    certificate-authority-data: LS0tLS.....
    server: https://api.tftest.encompasshost.internal
  name: tftest.encompasshost.internal
contexts:
- context:
    cluster: tftest.encompasshost.internal
    user: tftest.encompasshost.internal
  name: tftest.encompasshost.internal
current-context: tftest.encompasshost.internal
kind: Config
preferences: {}
users:
- name: tftest.encompasshost.internal
  user:
    client-certificate-data: LS0tLS.....
    client-key-data: LS0tLS.....
    password: super-secret-password
    username: admin
- name: tftest.encompasshost.internal-basic-auth
  user:
    password: super-secret-password
    username: admin
This holds all the credentials necessary for the admin user access to the cluster. For other lower level access, lets say read-only user, a separate certificates need to be created and associated to separate role in the cluster. There is an example here on expanding the kubectl config file for access to multiple clusters.
Kops creates a publicly accessible ELB that exposes the k8s API service point. The access is granted only to authorized users like the admin user in the above kubectl file and only from the IP’s specified via the ADMIN_ACCESS variable in the above script.
An AWS EBS storage class is also created for us automatically:
root@ip-10-99-7-127:~# kubectl get storageclass
NAME                TYPE
default (default)   kubernetes.io/aws-ebs

root@ip-10-99-7-127:~# kubectl describe storageclass default
Name:        default
IsDefaultClass:    Yes
Annotations:    kubectl.kubernetes.io/last-applied-configuration={"kind":"StorageClass","apiVersion":"storage.k8s.io/v1beta1","metadata":{"name":"default","creationTimestamp":null,"labels":{"k8s-addon":"storage-aws.addons.k8s.io","kubernetes.io/cluster-service":"true"},"annotations":{"storageclass.beta.kubernetes.io/is-default-class":"true"}},"provisioner":"kubernetes.io/aws-ebs","parameters":{"type":"gp2"}},storageclass.beta.kubernetes.io/is-default-class=true
Provisioner:    kubernetes.io/aws-ebs
Parameters:    type=gp2
No events.
that we can use to attach gp2 EBS volumes to the pods for services that need to store persistent data like MongoDB lets say via StatefulSets.
Known Issues and Limitations
There are missing tags that are not applied to the subnets when Kops creates k8s cluster in existing VPC. The following tags need to get applied after the k8s is created and before we start creating any type=LoadBalancer Service or Ingress:
KubernetesCluster = "tftest.encompasshost.internal"
This is not a big problem, we can apply the tags via Terraform while creating the VPC (knowing our k8s cluster name before we start of course). See the case I’ve opened for more details https://github.com/kubernetes/kops/issues/2388.
The subnet tagging also imposes a limitation that no more than one single k8s cluster can exist in a single VPC (they’ll be overwriting each others tags if that is the case), but since this will always be the case for us it is not something we should worry about.
Kops Add-ons
To add additional elements to the cluster like Dashboard, Heapster for basic CPU and RAM monitoring and Route53 plugin proceed to Installing Kubernetes Addons page in the Kops GitHub repository.
This article is Part 1 in a 6-Part Series Kubernetes Cluster in AWS.
- Part 1 - This Article
- Part 2 - Kubernetes Applications and Services
- Part 3 - Kubernetes Cluster External Services
- Part 4 - Kubernetes shared storage with S3 backend
- Part 5 - Kubernetes shared block storage with external GlusterFS backend
- Part 6 - Kubernetes - Exposing External Services to Pods via Consul


Leave a Comment