
OpenStack Icehouse Multi-node Installation with Ceph backend for Cinder and Glance
This is a standard Installation of OpenStack Icehouse on 3 x VM nodes: Controller, Compute and Networking. Later I decided to create 2 separate storage nodes for the Cinder service that will be using CEPH/RADOS cluster as object storage since I wanted to test this functionality as well.
These are the VM instances comprising the OpenStack setup, including the 3 for the Ceph cluster:
root@aywun:~# virsh list
 Id    Name                           State
----------------------------------------------------
 2     ostack-controller              running
 3     ostack-ceph1                   running
 4     ostack-ceph2                   running
 5     ostack-ceph3                   running
 6     ostack-network                 running
 7     ostack-compute                 running
 8     ostack-cinder-volume1          running
 9     ostack-cinder-volume2          running
 Picture1: Openstak test environment
Preparation
Networking
Network node interface setup:
# The primary network interface
auto eth0
iface eth0 inet static
	address 192.168.122.113
	netmask 255.255.255.0
	network 192.168.122.0
	broadcast 192.168.122.255
	gateway 192.168.122.1
	# dns-* options are implemented by the resolvconf package, if installed
	dns-nameservers 192.168.122.1
	dns-search virtual.local

# The Data nework interface
auto eth1
iface eth1 inet static
	address 192.168.133.113
	netmask 255.255.255.0

# The External nework interface
auto eth2
iface eth2 inet static
	address 192.168.144.113
	netmask 255.255.255.128
Compute node interface setup:
# The primary network interface
auto eth0
iface eth0 inet static
	address 192.168.122.112
	netmask 255.255.255.0
	network 192.168.122.0
	broadcast 192.168.122.255
	gateway 192.168.122.1
	# dns-* options are implemented by the resolvconf package, if installed
	dns-nameservers 192.168.122.1
	dns-search virtual.local

# The Data nework interface
auto eth1
iface eth1 inet static
	address 192.168.133.112
	netmask 255.255.255.0
Controller node interface setup:
# The primary network interface
auto eth0
iface eth0 inet static
	address 192.168.122.111
	netmask 255.255.255.0
	network 192.168.122.0
	broadcast 192.168.122.255
	gateway 192.168.122.1
	# dns-* options are implemented by the resolvconf package, if installed
	dns-nameservers 192.168.122.1
	dns-search virtual.local

# The API external nework interface
auto eth2
iface eth2 inet static
	address 192.168.144.144
	netmask 255.255.255.128
Meaning the Data and API network are sharing same /24 segment with Data having the lower end 192.168.144.0/25 and API network the upper half 192.168.144.129/25 of the range. The 192.168.122.0/24 is the Management network and the 192.168.133.0/24 is the VM data network.
The hosts file on the servers:
192.168.122.111	ostack-controller.virtual.local	ostack-controller
192.168.122.112	ostack-compute.virtual.local	ostack-compute
192.168.122.113	ostack-network.virtual.local	ostack-network
MySQL and OpenStack services DB setup
On the Controller node install mysql-server package and change the settings in /etc/mysql/my.cfg. First, set the bind address:
[mysqld]
...
bind-address = 0.0.0.0
Under the [mysqld] section. Then set the following keys to enable InnoDB, UTF-8 character set, and UTF-8 collation by default:
[mysqld]
...
default-storage-engine = innodb
innodb_file_per_table
collation-server = utf8_general_ci
init-connect = 'SET NAMES utf8'
character-set-server = utf8
Restart and finish off the installation.
# service mysql restart
# mysql_install_db
# mysql_secure_installation
Create the needed databases:
mysql -u root -ppassword<<EOF
CREATE DATABASE nova;
GRANT ALL PRIVILEGES ON nova.* TO 'novadbadmin'@'%'
  IDENTIFIED BY 'dieD9Mie';
EOF
mysql -v -u root -ppassword<<EOF
CREATE DATABASE glance;
GRANT ALL PRIVILEGES ON glance.* TO 'glancedbadmin'@'%'
  IDENTIFIED BY 'ohC3teiv';
EOF
mysql -v -u root -ppassword<<EOF
CREATE DATABASE keystone;
GRANT ALL PRIVILEGES ON keystone.* TO 'keystonedbadmin'@'%'
  IDENTIFIED BY 'Ue0Ud7ra';
EOF
mysql -v -u root -ppassword<<EOF
CREATE DATABASE cinder;
GRANT ALL PRIVILEGES ON cinder.* TO 'cinderdbadmin'@'%'
  IDENTIFIED BY 'Ue8Ud8re';
EOF
mysql -v -u root -ppassword<<EOF
CREATE DATABASE neutron;
GRANT ALL PRIVILEGES ON neutron.* TO 'neutrondbadmin'@'%'
  IDENTIFIED BY 'wozohB8g';
EOF
Enable some recommended kernel parameters:
net.ipv4.conf.default.rp_filter = 1
net.ipv4.conf.all.rp_filter = 1
net.ipv4.tcp_syncookies = 1
net.ipv4.ip_forward = 1
net.ipv4.conf.all.log_martians = 1
RabbitMQ
Install RabbitMQ package on the Controller node and change RabbitMQ password:
# rabbitmqctl change_password guest password
Keystone
Install needed packages:
root@ostack-controller:~# aptitude install keystone python-keystone python-keystoneclient qemu-utils
Edit the Keystone config file:
root@ostack-controller:~# vi /etc/keystone/keystone.conf
[DEFAULT]
admin_token=ADMIN
rabbit_host=localhost
rabbit_port=5672
rabbit_userid=guest
rabbit_password=password
log_dir=/var/log/keystone
...
[catalog]
driver=keystone.catalog.backends.sql.Catalog
...
[database]
connection = mysql://keystonedbadmin:Ue0Ud7ra@192.168.122.111/keystone
idle_timeout=200
...
[identity]
driver=keystone.identity.backends.sql.Identity
Populate the database schema:
root@ostack-controller:~# su -s /bin/sh -c "keystone-manage db_sync" keystone
root@ostack-controller:~# rm /var/lib/keystone/keystone.db
Run the following command to purge expired tokens every hour and log the output to the /var/log/keystone/keystone-tokenflush.log file:
root@ostack-controller:~# (crontab -l -u keystone 2>&1 | grep -q token_flush) || \
echo '@hourly /usr/bin/keystone-manage token_flush >/var/log/keystone/keystone-tokenflush.log 2>&1' \
>> /var/spool/cron/crontabs/keystone
This creates the folowwing cronjob for the keystone user:
root@ostack-controller:~# crontab -l -u keystone
@hourly /usr/bin/keystone-manage token_flush >/var/log/keystone/keystone-tokenflush.log 2>&1
Create tenants, users and roles, the script is available for download from here:
root@aywun:~# ./keystone_data.sh
Create endpoints (address of the API of each service), the script is available for download from here:
root@ostack-controller:~# ./endpoints.sh -m 192.168.122.111 -u keystonedbadmin -D keystone -p Ue0Ud7ra -K 192.168.122.111 -R RegionOne -E "http://192.168.122.111:35357/v2.0" -S 192.168.122.113 -T ADMIN
+-------------+----------------------------------+
|   Property  |              Value               |
+-------------+----------------------------------+
| description |    OpenStack Compute Service     |
|   enabled   |               True               |
|      id     | ee52b3f268f84e43849f40418328c3c8 |
|     name    |               nova               |
|     type    |             compute              |
+-------------+----------------------------------+
+-------------+----------------------------------+
|   Property  |              Value               |
+-------------+----------------------------------+
| description |     OpenStack Volume Service     |
|   enabled   |               True               |
|      id     | d1c5d9e2435146668c3a18238ba8b0fb |
|     name    |              volume              |
|     type    |              volume              |
+-------------+----------------------------------+
+-------------+----------------------------------+
|   Property  |              Value               |
+-------------+----------------------------------+
| description |     OpenStack Image Service      |
|   enabled   |               True               |
|      id     | 12dc6eea2b094ede93df56c466ddb0b4 |
|     name    |              glance              |
|     type    |              image               |
+-------------+----------------------------------+
+-------------+----------------------------------+
|   Property  |              Value               |
+-------------+----------------------------------+
| description |    OpenStack Storage Service     |
|   enabled   |               True               |
|      id     | f33af098d51c42b0a8e736f7aea6ba75 |
|     name    |              swift               |
|     type    |           object-store           |
+-------------+----------------------------------+
+-------------+----------------------------------+
|   Property  |              Value               |
+-------------+----------------------------------+
| description |        OpenStack Identity        |
|   enabled   |               True               |
|      id     | 42f85e2e1e714efda3f856a92fbf0f9f |
|     name    |             keystone             |
|     type    |             identity             |
+-------------+----------------------------------+
+-------------+----------------------------------+
|   Property  |              Value               |
+-------------+----------------------------------+
| description |      OpenStack EC2 service       |
|   enabled   |               True               |
|      id     | a9c2088d883849679c28db9d3bef0dc6 |
|     name    |               ec2                |
|     type    |               ec2                |
+-------------+----------------------------------+
+-------------+----------------------------------------------+
|   Property  |                    Value                     |
+-------------+----------------------------------------------+
|   adminurl  | http://192.168.122.111:8774/v2/%(tenant_id)s |
|      id     |       6c0e8f3a3f384b63a2229772637f4699       |
| internalurl | http://192.168.122.111:8774/v2/%(tenant_id)s |
|  publicurl  | http://192.168.122.111:8774/v2/%(tenant_id)s |
|    region   |                  RegionOne                   |
|  service_id |       ee52b3f268f84e43849f40418328c3c8       |
+-------------+----------------------------------------------+
+-------------+----------------------------------------------+
|   Property  |                    Value                     |
+-------------+----------------------------------------------+
|   adminurl  | http://192.168.122.111:8776/v1/%(tenant_id)s |
|      id     |       f4814fca1c1a414d85403407350650b5       |
| internalurl | http://192.168.122.111:8776/v1/%(tenant_id)s |
|  publicurl  | http://192.168.122.111:8776/v1/%(tenant_id)s |
|    region   |                  RegionOne                   |
|  service_id |       d1c5d9e2435146668c3a18238ba8b0fb       |
+-------------+----------------------------------------------+
+-------------+----------------------------------+
|   Property  |              Value               |
+-------------+----------------------------------+
|   adminurl  |  http://192.168.122.111:9292/v1  |
|      id     | 08ab9db2295f4f89acfb31737ad1c354 |
| internalurl |  http://192.168.122.111:9292/v1  |
|  publicurl  |  http://192.168.122.111:9292/v1  |
|    region   |            RegionOne             |
|  service_id | 12dc6eea2b094ede93df56c466ddb0b4 |
+-------------+----------------------------------+
+-------------+---------------------------------------------------+
|   Property  |                       Value                       |
+-------------+---------------------------------------------------+
|   adminurl  |           http://192.168.122.113:8080/v1          |
|      id     |          cf06c05b36a448809e843864a78db2bc         |
| internalurl | http://192.168.122.113:8080/v1/AUTH_%(tenant_id)s |
|  publicurl  | http://192.168.122.113:8080/v1/AUTH_%(tenant_id)s |
|    region   |                     RegionOne                     |
|  service_id |          f33af098d51c42b0a8e736f7aea6ba75         |
+-------------+---------------------------------------------------+
+-------------+-----------------------------------+
|   Property  |               Value               |
+-------------+-----------------------------------+
|   adminurl  | http://192.168.122.111:35357/v2.0 |
|      id     |  f1d9056f50b942c085c095c092e5d86e |
| internalurl |  http://192.168.122.111:5000/v2.0 |
|  publicurl  |  http://192.168.122.111:5000/v2.0 |
|    region   |             RegionOne             |
|  service_id |  42f85e2e1e714efda3f856a92fbf0f9f |
+-------------+-----------------------------------+
+-------------+--------------------------------------------+
|   Property  |                   Value                    |
+-------------+--------------------------------------------+
|   adminurl  | http://192.168.122.111:8773/services/Admin |
|      id     |      54a672b19ea74b8fa04548147ef66f2e      |
| internalurl | http://192.168.122.111:8773/services/Cloud |
|  publicurl  | http://192.168.122.111:8773/services/Cloud |
|    region   |                 RegionOne                  |
|  service_id |      a9c2088d883849679c28db9d3bef0dc6      |
+-------------+--------------------------------------------+
The -m specifies the address where MySQL is listening on, -u, -D and -p supply the access credentials for MySQL keystone DB, -K sets the Keystone host, -R sets the Openstack region, -E gives the Keystone service point, -S supplies the address for the (future) Swift service and finally -T gives the admin token.
Create the keystonerc file:
root@ostack-controller:~# vi keystonerc_admin
export OS_USERNAME=admin
export OS_PASSWORD=password
export OS_TENANT_NAME=admin
export OS_AUTH_URL=http://localhost:5000/v2.0/
export OS_VERSION=1.1
export OS_NO_CACHE=1
and source it out to load the credentials:
root@ostack-controller:~# . ./keystonerc_admin
Now we can access the Keystone service:
root@ostack-controller:~# keystone role-list
+----------------------------------+----------------------+
|                id                |         name         |
+----------------------------------+----------------------+
| 785bc0f9516243a2bef5edfebc074538 |    KeystoneAdmin     |
| ae31856bc9904017b16e2b8a1fd8990e | KeystoneServiceAdmin |
| 26f88fee2fa64aa3bc0fc2bf2fb43d45 |        Member        |
| c0542595bfaf43748b861c752012a75f |    ResellerAdmin     |
| 9fe2ff9ee4384b1894a90878d3e92bab |       _member_       |
| 09be25b0a1474cc9abbd29bdcd3b738b |        admin         |
| dc8bbb1a9a1041ab88667729fbae0ded |     anotherrole      |
+----------------------------------+----------------------+
root@ostack-controller:~# keystone tenant-list
+----------------------------------+--------------------+---------+
|                id                |        name        | enabled |
+----------------------------------+--------------------+---------+
| 4b53dc514f0a4f6bbfd89eac63f7b206 |       admin        |   True  |
| 9371007854e24ecd9a0fa87bd7426ac0 |        demo        |   True  |
| 35d820528ea3473191e0ffb16b55a84b | invisible_to_admin |   True  |
| d38657485ad24b9fb2e216dadc612f92 |      service       |   True  |
+----------------------------------+--------------------+---------+
root@ostack-controller:~# keystone user-list
+----------------------------------+---------+---------+-------------------------+
|                id                |   name  | enabled |          email          |
+----------------------------------+---------+---------+-------------------------+
| d6145ea56cc54bb4aa2b2b4a1c7ae6bb |  admin  |   True  |  admin@icicimov.com  |
| 156bd8b8193045c89b72c4bf8454dfb9 |   demo  |   True  |   demo@icicimov.com  |
| dacb282128df44f0be63b96bbf5382b5 |  glance |   True  |  glance@icicimov.com |
| effad9646b524c43b3aec467be48132c | neutron |   True  | neutron@icicimov.com |
| b52bf10633934e2eb1ed8f06df1fd033 |   nova  |   True  |   nova@icicimov.com  |
| 155fdfddc69545d5bc0e43a76f3c20f0 |  swift  |   True  |  swift@icicimov.com  |
+----------------------------------+---------+---------+-------------------------+
root@ostack-controller:~# keystone service-list
+----------------------------------+----------+--------------+---------------------------+
|                id                |   name   |     type     |        description        |
+----------------------------------+----------+--------------+---------------------------+
| a9c2088d883849679c28db9d3bef0dc6 |   ec2    |     ec2      |   OpenStack EC2 service   |
| 12dc6eea2b094ede93df56c466ddb0b4 |  glance  |    image     |  OpenStack Image Service  |
| 42f85e2e1e714efda3f856a92fbf0f9f | keystone |   identity   |     OpenStack Identity    |
| c1bf491d743b4d5ab874acd6365555b3 | neutron  |   network    |    OpenStack Networking   |
| ee52b3f268f84e43849f40418328c3c8 |   nova   |   compute    | OpenStack Compute Service |
| f33af098d51c42b0a8e736f7aea6ba75 |  swift   | object-store | OpenStack Storage Service |
| d1c5d9e2435146668c3a18238ba8b0fb |  volume  |    volume    |  OpenStack Volume Service |
+----------------------------------+----------+--------------+---------------------------+
root@ostack-controller:~# keystone endpoint-list
+----------------------------------+-----------+---------------------------------------------------+---------------------------------------------------+----------------------------------------------+----------------------------------+
|                id                |   region  |                     publicurl                     |                    internalurl                    |                   adminurl                   |            service_id            |
+----------------------------------+-----------+---------------------------------------------------+---------------------------------------------------+----------------------------------------------+----------------------------------+
| 08ab9db2295f4f89acfb31737ad1c354 | RegionOne |           http://192.168.122.111:9292/v1          |           http://192.168.122.111:9292/v1          |        http://192.168.122.111:9292/v1        | 12dc6eea2b094ede93df56c466ddb0b4 |
| 54a672b19ea74b8fa04548147ef66f2e | RegionOne |     http://192.168.122.111:8773/services/Cloud    |     http://192.168.122.111:8773/services/Cloud    |  http://192.168.122.111:8773/services/Admin  | a9c2088d883849679c28db9d3bef0dc6 |
| 6c0e8f3a3f384b63a2229772637f4699 | RegionOne |    http://192.168.122.111:8774/v2/%(tenant_id)s   |    http://192.168.122.111:8774/v2/%(tenant_id)s   | http://192.168.122.111:8774/v2/%(tenant_id)s | ee52b3f268f84e43849f40418328c3c8 |
| a5c435797a774bacb1b634d8b6f31d56 | regionOne |            http://192.168.122.111:9696            |            http://192.168.122.111:9696            |         http://192.168.122.111:9696          | c1bf491d743b4d5ab874acd6365555b3 |
| cf06c05b36a448809e843864a78db2bc | RegionOne | http://192.168.122.113:8080/v1/AUTH_%(tenant_id)s | http://192.168.122.113:8080/v1/AUTH_%(tenant_id)s |        http://192.168.122.113:8080/v1        | f33af098d51c42b0a8e736f7aea6ba75 |
| f1d9056f50b942c085c095c092e5d86e | RegionOne |          http://192.168.122.111:5000/v2.0         |          http://192.168.122.111:5000/v2.0         |      http://192.168.122.111:35357/v2.0       | 42f85e2e1e714efda3f856a92fbf0f9f |
| f4814fca1c1a414d85403407350650b5 | RegionOne |    http://192.168.122.111:8776/v1/%(tenant_id)s   |    http://192.168.122.111:8776/v1/%(tenant_id)s   | http://192.168.122.111:8776/v1/%(tenant_id)s | d1c5d9e2435146668c3a18238ba8b0fb |
+----------------------------------+-----------+---------------------------------------------------+---------------------------------------------------+----------------------------------------------+----------------------------------+
Glance
Installation:
root@ostack-controller:~# aptitude install glance python-glance
Edit the Glance API config file:
root@ostack-controller:~# vi /etc/glance/glance-api.conf
[DEFAULT]
...
rabbit_host = localhost
rabbit_port = 5672
rabbit_use_ssl = false
rabbit_userid = guest
rabbit_password = password
rabbit_virtual_host = /
rabbit_notification_exchange = glance
rabbit_notification_topic = notifications
rabbit_durable_queues = False
...
[database]
connection = mysql://glancedbadmin:ohC3teiv@192.168.122.111/glance
...
[keystone_authtoken]
auth_uri = http://192.168.122.111:5000/v2.0
auth_host = 192.168.122.111
auth_port = 35357
auth_protocol = http
admin_tenant_name = service
admin_user = glance
admin_password = password
...
[paste_deploy]
config_file = /etc/glance/glance-api-paste.ini
flavor=keystone
Then the Glance registry config file:
root@ostack-controller:~# vi /etc/glance/glance-registry.conf
...
[database]
connection = mysql://glancedbadmin:ohC3teiv@192.168.122.111/glance
...
[keystone_authtoken]
auth_uri = http://192.168.122.111:5000/v2.0
auth_host = 192.168.122.111
auth_port = 35357
auth_protocol = http
admin_tenant_name = service
admin_user = glance
admin_password = password
...
[paste_deploy]
config_file = /etc/glance/glance-api-paste.ini
flavor=keystone
Populate the db schema and remove the sqlite database file:
root@ostack-controller:~# su -s /bin/sh -c "glance-manage db_sync" glance
and restart the services:
root@ostack-controller:~# service glance-registry restart
root@ostack-controller:~# service glance-api restart
root@ostack-controller:~# rm -f /var/lib/glance/glance.sqlite
Create out first images:
root@ostack-controller:~# glance image-create --copy-from http://uec-images.ubuntu.com/releases/12.04/release/ubuntu-12.04-server-cloudimg-amd64-disk1.img --name="Ubuntu 12.04 cloudimg amd64" --is-public true --container-format ovf --disk-format qcow2
+------------------+--------------------------------------+
| Property         | Value                                |
+------------------+--------------------------------------+
| checksum         | None                                 |
| container_format | ovf                                  |
| created_at       | 2014-09-13T09:53:18                  |
| deleted          | False                                |
| deleted_at       | None                                 |
| disk_format      | qcow2                                |
| id               | e871958c-8bbd-42ec-ad16-31959949a43c |
| is_public        | True                                 |
| min_disk         | 0                                    |
| min_ram          | 0                                    |
| name             | Ubuntu 12.04 cloudimg amd64          |
| owner            | 4b53dc514f0a4f6bbfd89eac63f7b206     |
| protected        | False                                |
| size             | 261095936                            |
| status           | queued                               |
| updated_at       | 2014-09-13T09:53:18                  |
| virtual_size     | None                                 |
+------------------+--------------------------------------+

root@ostack-controller:~# glance image-create --copy-from http://download.cirros-cloud.net/0.3.1/cirros-0.3.1-x86_64-disk.img --name="CirrOS-0.3.1-x86_64" --is-public true --container-format bare --disk-format qcow2
+------------------+--------------------------------------+
| Property         | Value                                |
+------------------+--------------------------------------+
| checksum         | None                                 |
| container_format | bare                                 |
| created_at       | 2014-09-13T09:54:33                  |
| deleted          | False                                |
| deleted_at       | None                                 |
| disk_format      | qcow2                                |
| id               | a25d69b3-623a-40c6-aca3-00f1233295ea |
| is_public        | True                                 |
| min_disk         | 0                                    |
| min_ram          | 0                                    |
| name             | CirrOS-0.3.1-x86_64                  |
| owner            | 4b53dc514f0a4f6bbfd89eac63f7b206     |
| protected        | False                                |
| size             | 13147648                             |
| status           | queued                               |
| updated_at       | 2014-09-13T09:54:33                  |
| virtual_size     | None                                 |
+------------------+--------------------------------------+
and list the result:
root@ostack-controller:~# glance image-list
+--------------------------------------+-----------------------------+-------------+------------------+-----------+--------+
| ID                                   | Name                        | Disk Format | Container Format | Size      | Status |
+--------------------------------------+-----------------------------+-------------+------------------+-----------+--------+
| a25d69b3-623a-40c6-aca3-00f1233295ea | CirrOS-0.3.1-x86_64         | qcow2       | bare             | 13147648  | active |
| e871958c-8bbd-42ec-ad16-31959949a43c | Ubuntu 12.04 cloudimg amd64 | qcow2       | ovf              | 261095936 | saving |
+--------------------------------------+-----------------------------+-------------+------------------+-----------+--------+
Nova
Controller node
Install packages:
root@ostack-compute:~# aptitude install nova-api nova-cert nova-conductor nova-consoleauth nova-novncproxy nova-scheduler python-novaclient
Edit the Nova config file as follows:
root@ostack-controller:~# cat /etc/nova/nova.conf
[DEFAULT]
dhcpbridge_flagfile=/etc/nova/nova.conf
dhcpbridge=/usr/bin/nova-dhcpbridge
logdir=/var/log/nova
state_path=/var/lib/nova
lock_path=/var/lock/nova
force_dhcp_release=True
iscsi_helper=tgtadm
libvirt_use_virtio_for_bridges=True
connection_type=libvirt
root_helper=sudo nova-rootwrap /etc/nova/rootwrap.conf
verbose=True
ec2_private_dns_show_ip=True
api_paste_config=/etc/nova/api-paste.ini
volumes_path=/var/lib/nova/volumes
enabled_apis=ec2,osapi_compute,metadata
my_ip = 192.168.122.111
auth_strategy=keystone
sql_connection = mysql://novadbadmin:dieD9Mie@192.168.122.111/nova
rpc_backend = rabbit
rabbit_host = 192.168.122.111
rabbit_password = password
vncserver_listen = 192.168.122.111
vncserver_proxyclient_address = 192.168.122.111
glance_host = 192.168.122.111
## NETWORKING (NEUTRON) ##
network_api_class = nova.network.neutronv2.api.API
neutron_url = http://192.168.122.111:9696
neutron_auth_strategy = keystone
neutron_admin_tenant_name = service
neutron_admin_username = neutron
neutron_admin_password = password
neutron_admin_auth_url = http://192.168.122.111:35357/v2.0
linuxnet_interface_driver = nova.network.linux_net.LinuxOVSInterfaceDriver
firewall_driver = nova.virt.firewall.NoopFirewallDriver
security_group_api = neutron
# metadata proxy (running on the networking node)
# note: add these 2 lines after we have set Neutron service
service_neutron_metadata_proxy = true
neutron_metadata_proxy_shared_secret = password

[keystone_authtoken]
auth_uri = http://192.168.122.111:5000/v2.0
auth_host = 192.168.122.111
auth_port = 35357
auth_protocol = http
admin_tenant_name = service
admin_user = nova
admin_password = password
and restart all Nova services:
root@ostack-controller:~# for i in nova-api nova-cert nova-consoleauth nova-scheduler nova-conductor nova-novncproxy; do service $i restart; done
Get list of images and services:
root@ostack-controller:~# nova image-list
+--------------------------------------+-----------------------------+--------+--------+
| ID                                   | Name                        | Status | Server |
+--------------------------------------+-----------------------------+--------+--------+
| a25d69b3-623a-40c6-aca3-00f1233295ea | CirrOS-0.3.1-x86_64         | ACTIVE |        |
| e871958c-8bbd-42ec-ad16-31959949a43c | Ubuntu 12.04 cloudimg amd64 | ACTIVE |        |
+--------------------------------------+-----------------------------+--------+--------+

root@ostack-controller:~# nova service-list
+------------------+-------------------+----------+---------+-------+----------------------------+-----------------+
| Binary           | Host              | Zone     | Status  | State | Updated_at                 | Disabled Reason |
+------------------+-------------------+----------+---------+-------+----------------------------+-----------------+
| nova-cert        | ostack-controller | internal | enabled | up    | 2014-09-14T06:19:24.000000 | -               |
| nova-consoleauth | ostack-controller | internal | enabled | up    | 2014-09-14T06:19:24.000000 | -               |
| nova-scheduler   | ostack-controller | internal | enabled | up    | 2014-09-14T06:19:24.000000 | -               |
| nova-conductor   | ostack-controller | internal | enabled | up    | 2014-09-14T06:19:24.000000 | -               |
| nova-compute     | ostack-compute    | nova     | enabled | up    | 2014-09-14T06:19:24.000000 | -               |
+------------------+-------------------+----------+---------+-------+----------------------------+-----------------+
Compute node
root@ostack-compute:~# aptitude install nova-compute

root@ostack-compute:~# vi /etc/nova/nova.conf
[DEFAULT]
dhcpbridge_flagfile=/etc/nova/nova.conf
dhcpbridge=/usr/bin/nova-dhcpbridge
logdir=/var/log/nova
state_path=/var/lib/nova
lock_path=/var/lock/nova
force_dhcp_release=True
iscsi_helper=tgtadm
libvirt_use_virtio_for_bridges=True
connection_type=libvirt
root_helper=sudo nova-rootwrap /etc/nova/rootwrap.conf
verbose=True
ec2_private_dns_show_ip=True
api_paste_config=/etc/nova/api-paste.ini
volumes_path=/var/lib/nova/volumes
enabled_apis=ec2,osapi_compute,metadata
my_ip = 192.168.122.112
auth_strategy=keystone
sql_connection = mysql://novadbadmin:dieD9Mie@192.168.122.111/nova
rpc_backend = rabbit
rabbit_host = 192.168.122.111
rabbit_password = password
glance_host = 192.168.122.111
## VNC ##
vnc_enabled = True
vncserver_listen = 0.0.0.0
vncserver_proxyclient_address = 192.168.122.112
novncproxy_base_url = http://192.168.122.111:6080/vnc_auto.html

[keystone_authtoken]
auth_uri = http://192.168.122.111:5000/v2.0
auth_host = 192.168.122.111
auth_port = 35357
auth_protocol = http
admin_tenant_name = service
admin_user = nova
admin_password = password
Since I’m running on VM’s I can’t use hardware acceleration:
root@ostack-compute:~# grep -c '(vmx|svm)' /proc/cpuinfo
0
and have to switch from KVM to Qemu hypervisor:
root@ostack-compute:~# cat /etc/nova/nova-compute.conf
[DEFAULT]
compute_driver=libvirt.LibvirtDriver
[libvirt]
#virt_type=kvm
virt_type=qemu
Restart the service and remove the sqlite db file:
root@ostack-compute:~# service nova-compute restart
root@ostack-compute:~# rm -f /var/lib/nova/nova.sqlite
Neutron
Controller node
Create the Neutron keystone service and endpoint:
root@ostack-controller:~# keystone service-create --name neutron --type network --description "OpenStack Networking"

root@ostack-controller:~# keystone endpoint-create \
  --region RegionOne \
  --service-id \
    $(keystone service-list | awk '/ network / {print $2}') \
  --publicurl http://192.168.122.111:9696 \
  --adminurl http://192.168.122.111:9696 \
  --internalurl http://192.168.122.111:9696
Install the ML2 plug-in:
root@ostack-controller:~# aptitude install neutron-server neutron-plugin-ml2
Configure Networking to use the Modular Layer 2 (ML2) plug-in and associated services, plus add the DB connection and Keystone authentication settings:
root@ostack-controller:~# vi /etc/neutron/neutron.conf
[DEFAULT]
verbose = True
state_path = /var/lib/neutron
lock_path = $state_path/lock
...
core_plugin = ml2
service_plugins = router
auth_strategy = keystone
allow_overlapping_ips = True
...
rpc_backend = neutron.openstack.common.rpc.impl_kombu
rabbit_host = 192.168.122.111
rabbit_password = password
rabbit_port = 5672
rabbit_userid = guest
...
notification_driver = neutron.openstack.common.notifier.rpc_notifier
notify_nova_on_port_status_changes = True
notify_nova_on_port_data_changes = True
...
nova_url = http://192.168.122.111:8774/v2
nova_admin_username = nova
nova_admin_tenant_id = d38657485ad24b9fb2e216dadc612f92
nova_admin_password = password
nova_admin_auth_url = http://192.168.122.111:35357/v2.0
...
[keystone_authtoken]
auth_uri = http://192.168.122.111:5000
auth_host = 192.168.122.111
auth_port = 35357
auth_protocol = http
admin_tenant_name = service
admin_user = neutron
admin_password = password
...
[database]
connection = mysql://neutrondbadmin:wozohB8g@192.168.122.111/neutron
To obtain the value for nova_admin_tenant_id we run:
root@ostack-controller:~# keystone tenant-get service
+-------------+----------------------------------+
|   Property  |              Value               |
+-------------+----------------------------------+
| description |                                  |
|   enabled   |               True               |
|      id     | d38657485ad24b9fb2e216dadc612f92 |
|     name    |             service              |
+-------------+----------------------------------+
Then we configure the ML2 plugin:
root@ostack-controller:~# vi /etc/neutron/plugins/ml2/ml2_conf.ini
[ml2]
type_drivers = gre
tenant_network_types = gre
mechanism_drivers = openvswitch
...
[ml2_type_vlan]
network_vlan_ranges = 1:1000
...
[ml2_type_gre]
tunnel_id_ranges = 1:1000
...
[securitygroup]
enable_security_group = True
firewall_driver = neutron.agent.linux.iptables_firewall.OVSHybridIptablesFirewallDriver
Finally we tell Nova-Compute to use Neutron for networking by adding:
## NETWORKING (NEUTRON) ##
network_api_class = nova.network.neutronv2.api.API
neutron_url = http://192.168.122.111:9696
neutron_auth_strategy = keystone
neutron_admin_tenant_name = service
neutron_admin_username = neutron
neutron_admin_password = password
neutron_admin_auth_url = http://192.168.122.111:35357/v2.0
linuxnet_interface_driver = nova.network.linux_net.LinuxOVSInterfaceDriver
firewall_driver = nova.virt.firewall.NoopFirewallDriver
security_group_api = neutron
under the [DEFAULT] section in /etc/nova/nova.conf file and restarting the services.
Networking node
Install packages:
root@ostack-network:~# aptitude install neutron-plugin-ml2 neutron-plugin-openvswitch-agent openvswitch-datapath-dkms neutron-l3-agent neutron-dhcp-agent
Edit the Neutron config file:
root@ostack-network:~# vi /etc/neutron/neutron.conf
[DEFAULT]
verbose = True
...
core_plugin = ml2
service_plugins = router
auth_strategy = keystone
allow_overlapping_ips = True
...
rpc_backend = neutron.openstack.common.rpc.impl_kombu
rabbit_host = 192.168.122.111
rabbit_password = password
rabbit_port = 5672
rabbit_userid = guest
...
[keystone_authtoken]
auth_uri = http://192.168.122.111:5000
auth_host = 192.168.122.111
auth_port = 35357
auth_protocol = http
admin_tenant_name = service
admin_user = neutron
admin_password = password
signing_dir = $state_path/keystone-signing
the L3 agent config file:
root@ostack-network:~# vi /etc/neutron/l3_agent.ini
[DEFAULT]
verbose = True
interface_driver = neutron.agent.linux.interface.OVSInterfaceDriver
use_namespaces = True
and the DHCP agent config file:
root@ostack-network:~# vi /etc/neutron/dhcp_agent.ini
[DEFAULT]
verbose = True
interface_driver = neutron.agent.linux.interface.OVSInterfaceDriver
ovs_integration_bridge = br-int
dhcp_driver = neutron.agent.linux.dhcp.Dnsmasq
use_namespaces = True
dnsmasq_config_file = /etc/neutron/dnsmasq-neutron.conf
Then setup and restart dnsmasq that actually provides the DHCP services for the VM’s:
root@ostack-network:~# vi /etc/neutron/dnsmasq-neutron.conf
dhcp-option-force=26,1454

root@ostack-network:~# pkill dnsmasq
Configure the metadata agent:
root@ostack-network:~# vi /etc/neutron/metadata_agent.ini
[DEFAULT]
verbose = True
auth_url = http://192.168.122.111:5000/v2.0
auth_region = RegionOne
admin_tenant_name = service
admin_user = neutron
admin_password = password
nova_metadata_ip = 192.168.122.111
nova_metadata_port = 8775
metadata_proxy_shared_secret = password
On the Controller node add at the end of the Neutron section:
root@ostack-controller:~# vi /etc/nova/nova.conf
[DEFAULT]
...
# metadata proxy (running on the networking node)
service_neutron_metadata_proxy = true
neutron_metadata_proxy_shared_secret = password
and restart the api service:
root@ostack-controller:~# service nova-api restart
Back on the Networking node configure the ML2 plug-in with GRE tunneling:
root@ostack-network:~# vi /etc/neutron/plugins/ml2/ml2_conf.ini
...
[ml2]
type_drivers = gre
tenant_network_types = gre
mechanism_drivers = openvswitch
...
[ml2_type_gre]
tunnel_id_ranges = 1:1000
...
[ovs]
local_ip = 192.168.133.113
tunnel_type = gre
enable_tunneling = True

[securitygroup]
firewall_driver = neutron.agent.linux.iptables_firewall.OVSHybridIptablesFirewallDriver
enable_security_group = True
The OVS service provides the underlying virtual networking framework for instances. The integration bridge br-int handles internal instance network traffic within OVS. The external bridge br-ex handles external instance network traffic within OVS. The external bridge requires a port on the physical external network interface to provide instances with external network access. In essence, this port bridges the virtual and physical external networks in your environment.
root@ostack-network:~# ovs-vsctl add-br br-ex
root@ostack-network:~# ovs-vsctl add-port br-ex eth2
root@ostack-network:~# ovs-vsctl show
e6ef64d8-e27e-472b-89b7-2d0fcb590d9c
    Bridge br-int
        fail_mode: secure
        Port br-int
            Interface br-int
                type: internal
    Bridge br-ex
        Port br-ex
            Interface br-ex
                type: internal
        Port "eth2"
            Interface "eth2"
    ovs_version: "2.0.2"
Restart the Neutron services:
root@ostack-network:~# service neutron-plugin-openvswitch-agent restart
root@ostack-network:~# service neutron-l3-agent restart
root@ostack-network:~# service neutron-dhcp-agent restart
root@ostack-network:~# service neutron-metadata-agent restart
and check for the created OVS ports and interfaces:
root@ostack-network:~# ip a | grep state
1: lo: <LOOPBACK,UP,LOWER_UP> mtu 65536 qdisc noqueue state UNKNOWN group default
2: eth0: <BROADCAST,MULTICAST,UP,LOWER_UP> mtu 1500 qdisc pfifo_fast state UP group default qlen 1000
3: eth1: <BROADCAST,MULTICAST,UP,LOWER_UP> mtu 1500 qdisc pfifo_fast state UP group default qlen 1000
4: eth2: <BROADCAST,MULTICAST,UP,LOWER_UP> mtu 1500 qdisc pfifo_fast master ovs-system state UP group default qlen 1000
5: ovs-system: <BROADCAST,MULTICAST> mtu 1500 qdisc noop state DOWN group default
6: br-ex: <BROADCAST,UP,LOWER_UP> mtu 1500 qdisc noqueue state UNKNOWN group default
8: br-int: <BROADCAST,UP,LOWER_UP> mtu 1500 qdisc noqueue state UNKNOWN group default
12: br-tun: <BROADCAST,UP,LOWER_UP> mtu 1500 qdisc noqueue state UNKNOWN group default

root@ostack-network:~# ovs-vsctl list-ports br-ex
eth2
qg-3c95c6ae-1c

root@ostack-network:~# ovs-vsctl list-ports br-int
patch-tun
qr-7db3920b-bb

root@ostack-network:~# ovs-vsctl list-ports br-tun
patch-int
On the Controller node we can see the following Neutron agents running:
root@ostack-controller:~# neutron agent-list
+--------------------------------------+--------------------+----------------+-------+----------------+
| id                                   | agent_type         | host           | alive | admin_state_up |
+--------------------------------------+--------------------+----------------+-------+----------------+
| 3f01bd6e-99e7-4a28-bec7-2edba4df479d | Open vSwitch agent | ostack-compute | :-)   | True           |
| 5534539d-68b8-40f1-9e44-52795cfa0cc8 | Open vSwitch agent | ostack-network | :-)   | True           |
| 698b412a-948a-4a12-901f-e92363b41dd6 | L3 agent           | ostack-network | :-)   | True           |
| bd3678a8-9537-4631-8c57-6e3f1eb872f8 | Metadata agent     | ostack-network | :-)   | True           |
| faeb4bb6-4449-4381-8ab1-0d02425dc29c | DHCP agent         | ostack-network | :-)   | True           |
+--------------------------------------+--------------------+----------------+-------+----------------+
Compute node
Install Neutron packages needed:
root@ostack-compute:~# aptitude install neutron-plugin-ml2 neutron-plugin-openvswitch-agent
Create the initial networks
We run this on the Controller node.
First External network:
root@ostack-controller:~# neutron net-create ext-net --shared --router:external True
Created a new network:
+---------------------------+--------------------------------------+
| Field                     | Value                                |
+---------------------------+--------------------------------------+
| admin_state_up            | True                                 |
| id                        | 4d584b71-1b3a-46a5-b32a-7fd2ba3e2535 |
| name                      | ext-net                              |
| provider:network_type     | gre                                  |
| provider:physical_network |                                      |
| provider:segmentation_id  | 1                                    |
| router:external           | True                                 |
| shared                    | True                                 |
| status                    | ACTIVE                               |
| subnets                   |                                      |
| tenant_id                 | 4b53dc514f0a4f6bbfd89eac63f7b206     |
+---------------------------+--------------------------------------+
and first external pseudo subnet:
root@ostack-controller:~# neutron subnet-create ext-net --name ext-subnet --allocation-pool start=192.168.144.2,end=192.168.144.120 --disable-dhcp --gateway 192.168.144.1 192.168.144.0/25
Created a new subnet:
+------------------+------------------------------------------------------+
| Field            | Value                                                |
+------------------+------------------------------------------------------+
| allocation_pools | {"start": "192.168.144.2", "end": "192.168.144.120"} |
| cidr             | 192.168.144.0/25                                     |
| dns_nameservers  |                                                      |
| enable_dhcp      | False                                                |
| gateway_ip       | 192.168.144.1                                        |
| host_routes      |                                                      |
| id               | e796143e-1ad0-4d7d-8967-6b47191e284f                 |
| ip_version       | 4                                                    |
| name             | ext-subnet                                           |
| network_id       | 4d584b71-1b3a-46a5-b32a-7fd2ba3e2535                 |
| tenant_id        | 4b53dc514f0a4f6bbfd89eac63f7b206                     |
+------------------+------------------------------------------------------+
Then Internal one for VM’s intercommunication:
root@ostack-controller:~# neutron net-create demo-net
Created a new network:
+---------------------------+--------------------------------------+
| Field                     | Value                                |
+---------------------------+--------------------------------------+
| admin_state_up            | True                                 |
| id                        | 2322ae02-88a9-4daa-898d-1c4c0b2653ca |
| name                      | demo-net                             |
| provider:network_type     | gre                                  |
| provider:physical_network |                                      |
| provider:segmentation_id  | 2                                    |
| shared                    | False                                |
| status                    | ACTIVE                               |
| subnets                   |                                      |
| tenant_id                 | 4b53dc514f0a4f6bbfd89eac63f7b206     |
+---------------------------+--------------------------------------+

root@ostack-controller:~# neutron subnet-create demo-net --name demo-subnet --gateway 10.0.0.1 10.0.0.0/24
Created a new subnet:
+------------------+--------------------------------------------+
| Field            | Value                                      |
+------------------+--------------------------------------------+
| allocation_pools | {"start": "10.0.0.2", "end": "10.0.0.254"} |
| cidr             | 10.0.0.0/24                                |
| dns_nameservers  |                                            |
| enable_dhcp      | True                                       |
| gateway_ip       | 10.0.0.1                                   |
| host_routes      |                                            |
| id               | a55ce25e-21fe-4619-b12e-8573664e6a36       |
| ip_version       | 4                                          |
| name             | demo-subnet                                |
| network_id       | 2322ae02-88a9-4daa-898d-1c4c0b2653ca       |
| tenant_id        | 4b53dc514f0a4f6bbfd89eac63f7b206           |
+------------------+--------------------------------------------+
A virtual router passes network traffic between two or more virtual networks. Each router requires one or more interfaces and/or gateways that provide access to specific networks. In this case, you will create a router and attach your tenant and external networks to it.
root@ostack-controller:~# neutron router-create demo-router
Created a new router:
+-----------------------+--------------------------------------+
| Field                 | Value                                |
+-----------------------+--------------------------------------+
| admin_state_up        | True                                 |
| external_gateway_info |                                      |
| id                    | a81c303a-b1a8-4817-906a-42b863817d1d |
| name                  | demo-router                          |
| status                | ACTIVE                               |
| tenant_id             | 4b53dc514f0a4f6bbfd89eac63f7b206     |
+-----------------------+--------------------------------------+

root@ostack-controller:~# neutron router-interface-add demo-router demo-subnet
Added interface 7db3920b-bb78-4ce4-9f9b-dafff1d5271c to router demo-router.

root@ostack-controller:~# neutron router-gateway-set demo-router ext-net
Set gateway for router demo-router
What we did here is created a router, attached it to the demo tenant subnet AND to the external network by setting it as the gateway.
This is the result we can see:
root@ostack-controller:~# neutron net-list
+--------------------------------------+----------+-------------------------------------------------------+
| id                                   | name     | subnets                                               |
+--------------------------------------+----------+-------------------------------------------------------+
| 2322ae02-88a9-4daa-898d-1c4c0b2653ca | demo-net | a55ce25e-21fe-4619-b12e-8573664e6a36 10.0.0.0/24      |
| 4d584b71-1b3a-46a5-b32a-7fd2ba3e2535 | ext-net  | e796143e-1ad0-4d7d-8967-6b47191e284f 192.168.144.0/25 |
+--------------------------------------+----------+-------------------------------------------------------+

root@ostack-controller:~# neutron router-list
+--------------------------------------+-------------+-----------------------------------------------------------------------------+
| id                                   | name        | external_gateway_info                                                       |
+--------------------------------------+-------------+-----------------------------------------------------------------------------+
| a81c303a-b1a8-4817-906a-42b863817d1d | demo-router | {"network_id": "4d584b71-1b3a-46a5-b32a-7fd2ba3e2535", "enable_snat": true} |
+--------------------------------------+-------------+-----------------------------------------------------------------------------+
Now the router we created for the external network should be reachable from the outside. We test by pinging it from the host it self:
igorc@silverstone:~/Downloads$ ping -c 4 192.168.144.1
PING 192.168.144.1 (192.168.144.1) 56(84) bytes of data.
64 bytes from 192.168.144.1: icmp_seq=1 ttl=64 time=0.094 ms
64 bytes from 192.168.144.1: icmp_seq=2 ttl=64 time=0.089 ms
64 bytes from 192.168.144.1: icmp_seq=3 ttl=64 time=0.054 ms
64 bytes from 192.168.144.1: icmp_seq=4 ttl=64 time=0.046 ms

--- 192.168.144.1 ping statistics ---
4 packets transmitted, 4 received, 0% packet loss, time 2997ms
rtt min/avg/max/mdev = 0.046/0.070/0.094/0.023 ms
igorc@silverstone:~/Downloads$
All good here.
Horizon
Simply install the Horizon packages on the Controller node:
root@ostack-controller:~# aptitude install apache2 memcached libapache2-mod-wsgi openstack-dashboard
and connect to http://192.168.122.111/horizon to access the dashboard.
Cinder
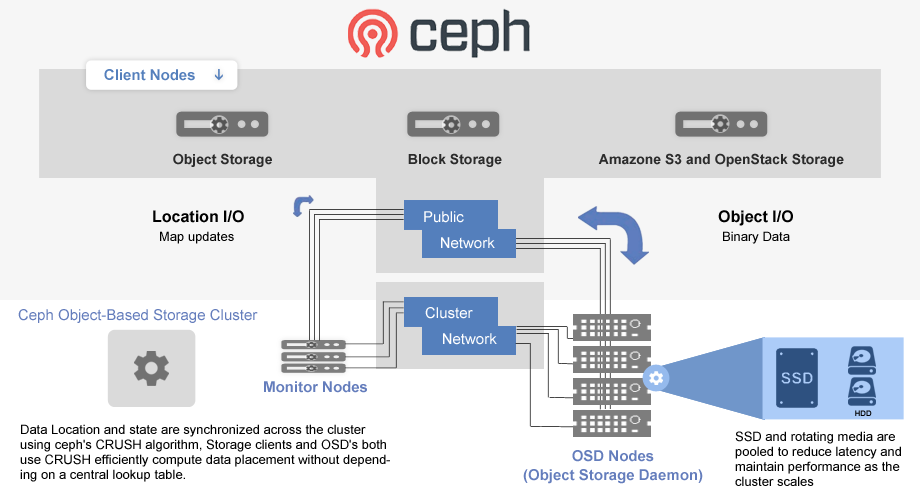
In this example I have setup 2 Cinder Volume nodes with Ceph backend of 3 clustered nodes.
        192.168.122.214             |             192.168.122.216
     +------------------+           |           +-----------------+
     |[ Cinder Volume ] |           |           |[ Cinder Volume ]|
     |      node1       |-----------+-----------|      node2      |
     +------------------+           |           +-----------------+
                                    |
        +---------------------------+--------------------------+
        |                           |                          |
        |192.168.122.211            |192.168.122.212           |192.168.122.213
+-------+----------+       +--------+---------+       +--------+---------+
| [ Ceph Node #1 ] |       | [ Ceph Node #2 ] |       | [ Ceph Node #3 ] |
|  Monitor Daemon  +-------+  Monitor Daemon  +-------+  Monitor Daemon  |
|  Object Storage  |       |  Object Storage  |       |  Object Storage  |
| Meta Data Server |       | Meta Data Server |       | Meta Data Server |
|   Ceph-Deploy    |       |                  |       |                  |
+------------------+       +------------------+       +------------------+
Ceph cluster setup
First setup a password-less login for igorc user from ostack-ceph1 to ostack-ceph2 and ostack-ceph3:
igorc@ostack-ceph1:~$ ssh-keygen -t rsa -f /home/igorc/.ssh/id_rsa -N ''
on ostack-ceph1 only:
igorc@ostack-ceph1:~$ cat /home/igorc/.ssh/id_rsa.pub | ssh igorc@ostack-ceph2 "cat >> ~/.ssh/authorized_keys"
igorc@ostack-ceph1:~$ cat /home/igorc/.ssh/id_rsa.pub | ssh igorc@ostack-ceph3 "cat >> ~/.ssh/authorized_keys"
igorc@ostack-ceph1:~$ ssh igorc@ostack-ceph2 "chmod 600 ~/.ssh/authorized_keys"
igorc@ostack-ceph1:~$ ssh igorc@ostack-ceph3 "chmod 600 ~/.ssh/authorized_keys"
and set:
%sudo ALL=(ALL:ALL) NOPASSWD:ALL
in /etc/sudoers file on each server.
Prepare the installation on ostack-ceph1:
$ wget -q -O- 'https://ceph.com/git/?p=ceph.git;a=blob_plain;f=keys/release.asc' | sudo apt-key add -
$ echo deb http://ceph.com/debian-dumpling/ $(lsb_release -sc) main | sudo tee /etc/apt/sources.list.d/ceph.list
$ sudo aptitude update && sudo aptitude install ceph-deploy
Then initiate the new cluster using ceph-deploy:
igorc@ostack-ceph1:~$ mkdir ceph-cluster && cd ceph-cluster
igorc@ostack-ceph1:~/ceph-cluster$ ceph-deploy install ostack-ceph1 ostack-ceph2 ostack-ceph3
igorc@ostack-ceph1:~/ceph-cluster$ ceph-deploy --cluster ceph new ostack-ceph{1,2,3}
Then we need to modify the ceph.conf file:
igorc@ostack-ceph1:~/ceph-cluster$ vi ceph.conf
[global]
fsid = ed8d8819-e05b-48d4-ba9f-f0bc8493f18f
mon_initial_members = ostack-ceph1, ostack-ceph2, ostack-ceph3
mon_host = 192.168.122.211, 192.168.122.212, 192.168.122.213
auth_cluster_required = cephx
auth_service_required = cephx
auth_client_required = cephx
filestore_xattr_use_omap = true
public_network = 192.168.122.0/24

[mon.ostack-ceph1]
     host = ostack-ceph1
     mon addr = 192.168.122.211:6789

[mon.ostack-ceph2]
     host = ostack-ceph2
     mon addr = 192.168.122.212:6789

[mon.ostack-ceph3]
     host = ostack-ceph3
     mon addr = 192.168.122.213:6789

[osd]
osd_journal_size = 512
osd_pool_default_size = 3
osd_pool_default_min_size = 1
osd_pool_default_pg_num = 64
osd_pool_default_pgp_num = 64
and continue with Monitors installation:
igorc@ostack-ceph1:~/ceph-cluster$ ceph-deploy mon create ostack-ceph1 ostack-ceph2 ostack-ceph3
igorc@ostack-ceph1:~/ceph-cluster$ ceph-deploy gatherkeys ostack-ceph1
igorc@ostack-ceph1:~/ceph-cluster$ sudo chmod +r /etc/ceph/ceph.client.admin.keyring
and check for cluster status:
igorc@ostack-ceph1:~/ceph-cluster$ ceph quorum_status --format json-pretty

{ "election_epoch": 6,
  "quorum": [
        0,
        1,
        2],
  "quorum_names": [
        "ostack-ceph1",
        "ostack-ceph2",
        "ostack-ceph3"],
  "quorum_leader_name": "ostack-ceph1",
  "monmap": { "epoch": 1,
      "fsid": "ed8d8819-e05b-48d4-ba9f-f0bc8493f18f",
      "modified": "0.000000",
      "created": "0.000000",
      "mons": [
            { "rank": 0,
              "name": "ostack-ceph1",
              "addr": "192.168.122.211:6789\/0"},
            { "rank": 1,
              "name": "ostack-ceph2",
              "addr": "192.168.122.212:6789\/0"},
            { "rank": 2,
              "name": "ostack-ceph3",
              "addr": "192.168.122.213:6789\/0"}]}}
Then we set the OSD’s:
igorc@ostack-ceph1:~/ceph-cluster$ ceph-deploy --overwrite-conf osd --zap-disk create ostack-ceph1:/dev/sda ostack-ceph2:/dev/sda ostack-ceph3:/dev/sda
igorc@ostack-ceph1:~/ceph-cluster$ ceph osd pool create datastore 100
pool 'datastore' created
The number of placement groups (pgp) is based on 100 x the number of OSD’s / the number of replicas we want to maintain. I want 3 copies of the data (so if a server fails no data is lost), so 3 x 100 / 3 = 100.
Setup the MDS service:
igorc@ostack-ceph1:~/ceph-cluster$ ceph-deploy --overwrite-conf mds create ostack-ceph1 ostack-ceph2 ostack-ceph3
igorc@ostack-ceph1:~/ceph-cluster$ ceph osd pool create cephfs_metadata 64
igorc@ostack-ceph1:~/ceph-cluster$ ceph osd pool create cephfs_data 64
igorc@ostack-ceph1:~/ceph-cluster$ ceph fs new cephfs cephfs_metadata cephfs_data
new fs with metadata pool 2 and data pool 1

igorc@ostack-ceph1:~/ceph-cluster$ ceph osd lspools
0 rbd,1 cephfs_data,2 cephfs_metadata,3 datastore,4 images,

igorc@ostack-ceph1:~/ceph-cluster$ ceph fs ls
name: cephfs, metadata pool: cephfs_metadata, data pools: [cephfs_data ]
Now our MDS will be up and active:
igorc@ostack-ceph1:~/ceph-cluster$ ceph mds stat
e5: 1/1/1 up {0=ostack-ceph1=up:active}

igorc@ostack-ceph1:~/ceph-cluster$ ceph status
    cluster 5f1b2264-ab6d-43c3-af6c-3062e707a623
     health HEALTH_WARN
            too many PGs per OSD (320 > max 300)
     monmap e1: 3 mons at {ostack-ceph1=192.168.122.211:6789/0,ostack-ceph2=192.168.122.212:6789/0,ostack-ceph3=192.168.122.213:6789/0}
            election epoch 4, quorum 0,1,2 ostack-ceph1,ostack-ceph2,ostack-ceph3
     mdsmap e5: 1/1/1 up {0=ostack-ceph1=up:active}
     osdmap e25: 3 osds: 3 up, 3 in
      pgmap v114: 320 pgs, 5 pools, 1962 bytes data, 20 objects
            107 MB used, 22899 MB / 23006 MB avail
                 320 active+clean

igorc@ostack-ceph1:~/ceph-cluster$ ceph osd tree
ID WEIGHT  TYPE NAME             UP/DOWN REWEIGHT PRIMARY-AFFINITY
-1 0.02998 root default
-2 0.00999     host ostack-ceph1
 0 0.00999         osd.0              up  1.00000          1.00000
-3 0.00999     host ostack-ceph2
 1 0.00999         osd.1              up  1.00000          1.00000
-4 0.00999     host ostack-ceph3
 2 0.00999         osd.2              up  1.00000          1.00000
Next we create the keyring for the datastore pool we created:
igorc@ostack-ceph1:~/ceph-cluster$ sudo ceph-authtool --create-keyring /etc/ceph/ceph.client.datastore.keyring
creating /etc/ceph/ceph.client.datastore.keyring

igorc@ostack-ceph1:~/ceph-cluster$ sudo chmod +r /etc/ceph/ceph.client.datastore.keyring
add new key to the keyring and set proper permissions for the datastore client on the datastore pool:
igorc@ostack-ceph1:~/ceph-cluster$ sudo ceph-authtool /etc/ceph/ceph.client.datastore.keyring -n client.datastore --gen-key
igorc@ostack-ceph1:~/ceph-cluster$ sudo ceph-authtool -n client.datastore --cap mon 'allow r' --cap osd 'allow class-read object_prefix rbd_children, allow rwx pool=datastore' /etc/ceph/ceph.client.datastore.keyring

igorc@ostack-ceph1:~/ceph-cluster$ ceph auth add client.datastore -i /etc/ceph/ceph.client.datastore.keyring
added key for client.datastore
Now, we add the client.datastore user settings to the local ceph.conf file:
...
[client.datastore]
     keyring = /etc/ceph/ceph.client.datastore.keyring
and push that to all cluster members
igorc@ostack-ceph1:~/ceph-cluster$ ceph-deploy --overwrite-conf config push ostack-ceph1 ostack-ceph2 ostack-ceph3
Since we have MON service running on each host we want to be able to mount from each host too so we need to copy the new key we created:
igorc@ostack-ceph1:~/ceph-cluster$ scp /etc/ceph/ceph.client.datastore.keyring ostack-ceph2:~ && ssh ostack-ceph2 sudo cp ceph.client.datastore.keyring /etc/ceph/
igorc@ostack-ceph1:~/ceph-cluster$ scp /etc/ceph/ceph.client.datastore.keyring ostack-ceph3:~ && ssh ostack-ceph3 sudo cp ceph.client.datastore.keyring /etc/ceph/
Next we create a separate pool for the Glance images, repeating the above procedure for the keyring and the user:
igorc@ostack-ceph1:~/ceph-cluster$ ceph osd pool create images 64
pool 'images' created

igorc@ostack-ceph1:~/ceph-cluster$ sudo ceph-authtool --create-keyring /etc/ceph/ceph.client.images.keyring
creating /etc/ceph/ceph.client.images.keyring

igorc@ostack-ceph1:~/ceph-cluster$ sudo chmod +r /etc/ceph/ceph.client.images.keyring
igorc@ostack-ceph1:~/ceph-cluster$ sudo ceph-authtool /etc/ceph/ceph.client.images.keyring -n client.images --gen-key
igorc@ostack-ceph1:~/ceph-cluster$ sudo ceph-authtool -n client.images --cap mon 'allow r' --cap osd 'allow class-read object_prefix rbd_children, allow rwx pool=images' /etc/ceph/ceph.client.images.keyring
igorc@ostack-ceph1:~/ceph-cluster$ ceph auth add client.images -i /etc/ceph/ceph.client.images.keyring
added key for client.images
Now, we add the client.images user settings to the local ceph.conf file:
...
[client.images]
     keyring = /etc/ceph/ceph.client.images.keyring
and push that to all cluster members:
igorc@ostack-ceph1:~/ceph-cluster$ ceph-deploy --overwrite-conf config push ostack-ceph1 ostack-ceph2 ostack-ceph3
Since we have MON service running on each host we want to be able to mount from each host too so we need to copy the new key we created:
igorc@ostack-ceph1:~/ceph-cluster$ scp /etc/ceph/ceph.client.images.keyring ostack-ceph2:~ && ssh ostack-ceph2 sudo cp ceph.client.images.keyring /etc/ceph/
igorc@ostack-ceph1:~/ceph-cluster$ scp /etc/ceph/ceph.client.images.keyring ostack-ceph3:~ && ssh ostack-ceph3 sudo cp ceph.client.images.keyring /etc/ceph/
And copy over the keyring to the Controller node where Glance is running:
root@ostack-controller:~# vi /etc/ceph/ceph.client.images.keyring
root@ostack-controller:~# chmod +r /etc/ceph/ceph.client.images.keyring
Cinder setup
Controller node
Create Cinder user and admin role:
root@ostack-controller:~# keystone user-create --name=cinder --pass=password --tenant_id d38657485ad24b9fb2e216dadc612f92 --email=cinder@icicimov.com
+----------+----------------------------------+
| Property |              Value               |
+----------+----------------------------------+
|  email   |      cinder@icicimov.com      |
| enabled  |               True               |
|    id    | 30754a3c623f4ea2a4563d0092dd74f1 |
|   name   |              cinder              |
| tenantId | d38657485ad24b9fb2e216dadc612f92 |
| username |              cinder              |
+----------+----------------------------------+
root@ostack-controller:~# keystone user-role-add --tenant_id d38657485ad24b9fb2e216dadc612f92 --user 30754a3c623f4ea2a4563d0092dd74f1 --role admin
Install Cinder packages:
root@ostack-controller:~# aptitude install cinder-api cinder-scheduler python-cinderclient
and configure Cinder to include Ceph backend as storage using the rbd driver:
root@ostack-controller:~# cat /etc/cinder/cinder.conf
[DEFAULT]
rootwrap_config = /etc/cinder/rootwrap.conf
api_paste_confg = /etc/cinder/api-paste.ini
iscsi_helper = tgtadm
volume_name_template = volume-%s
volume_group = cinder-volumes
verbose = True
auth_strategy = keystone
state_path = /var/lib/cinder
lock_path = /var/lock/cinder
volumes_dir = /var/lib/cinder/volumes
rpc_backend = rabbit
rabbit_host = 192.168.122.111
rabbit_password = password
rabbit_userid = guest
## Ceph backend ##
volume_driver=cinder.volume.drivers.rbd.RBDDriver
rbd_pool=datastore
rbd_ceph_conf=/etc/ceph/ceph.conf
rbd_flatten_volume_from_snapshot=false
rbd_max_clone_depth=5
rbd_user=icehouse
glance_api_version=2

[database]
connection = mysql://cinderdbadmin:Ue8Ud8re@192.168.122.111/cinder

[keystone_authtoken]
auth_uri = http://192.168.122.111:5000/v2.0
auth_host = 192.168.122.111
auth_port = 35357
auth_protocol = http
admin_tenant_name = service
admin_user = cinder
admin_password = password
Populate the db schema:
root@ostack-controller:~# su -s /bin/sh -c "cinder-manage db sync" cinder
and restart Cinder services:
root@ostack-controller:~# service cinder-scheduler restart
root@ostack-controller:~# service cinder-api restart

root@ostack-controller:~# rm -f /var/lib/cinder/cinder.sqlite
Now prepare the ceph configuration:
root@ostack-controller:~# aptitude install ceph-common python-ceph
root@ostack-controller:~# mkdir /etc/ceph
and copy the /etc/ceph/ceph.conf and /etc/ceph/ceph.client.datastore.keyring from the ceph cluster and set the keyring permission to read so Cinder can open the file:
root@ostack-controller:~# chmod +r /etc/ceph/ceph.client.datastore.keyring
root@ostack-controller:~# service cinder-api restart
Volume nodes
Install Cinder packages:
root@ostack-cinder-volume1:~# aptitude install cinder-volume python-mysqldb sysfsutils
and configure Cinder:
root@ostack-cinder-volume1:~# cat /etc/cinder/cinder.conf
[DEFAULT]
rootwrap_config = /etc/cinder/rootwrap.conf
api_paste_confg = /etc/cinder/api-paste.ini
iscsi_helper = tgtadm
volume_name_template = volume-%s
volume_group = cinder-volumes
verbose = True
auth_strategy = keystone
state_path = /var/lib/cinder
lock_path = /var/lock/cinder
volumes_dir = /var/lib/cinder/volumes
rpc_backend = rabbit
rabbit_host = 192.168.122.111
rabbit_password = password
rabbit_userid = guest
glance_host = 192.168.122.111
## Ceph backend ##
volume_driver=cinder.volume.drivers.rbd.RBDDriver
rbd_pool=datastore
rbd_ceph_conf=/etc/ceph/ceph.conf
rbd_flatten_volume_from_snapshot=false
rbd_max_clone_depth=5
rbd_user=datastore
glance_api_version=2
#rbd_secret_uuid=e1915277-e3a5-4547-bc9e-xxxxxxx
quota_volumes=20
quota_snapshots=20

[database]
connection = mysql://cinderdbadmin:Ue8Ud8re@192.168.122.111/cinder

[keystone_authtoken]
auth_uri = http://192.168.122.111:5000/v2.0
auth_host = 192.168.122.111
auth_port = 35357
auth_protocol = http
admin_tenant_name = service
admin_user = cinder
admin_password = password
Now prepare the ceph configuration:
root@ostack-cinder-volume1:~# aptitude install ceph-common python-ceph ceph-fuse ceph-fs-common
root@ostack-cinder-volume1:~# mkdir /etc/ceph
and copy the /etc/ceph/ceph.conf and /etc/ceph/ceph.client.datastore.keyring from the ceph cluster and set the keyring permission to read so Cinder can open the file:
root@ostack-cinder-volume1:~# chmod +r /etc/ceph/ceph.client.datastore.keyring
root@ostack-cinder-volume1:~# service cinder-volume restart
Create the first volume
Finally we go and create our first Ceph backed volume:
root@ostack-controller:~# nova volume-create --display_name "volume1" 1
+---------------------+--------------------------------------+
| Property            | Value                                |
+---------------------+--------------------------------------+
| attachments         | []                                   |
| availability_zone   | nova                                 |
| bootable            | false                                |
| created_at          | 2014-09-17T02:45:06.999692           |
| display_description | -                                    |
| display_name        | volume1                              |
| encrypted           | False                                |
| id                  | d137be6f-7c40-447c-8106-30d0ff8d9a20 |
| metadata            | {}                                   |
| size                | 1                                    |
| snapshot_id         | -                                    |
| source_volid        | -                                    |
| status              | creating                             |
| volume_type         | None                                 |
+---------------------+--------------------------------------+

root@ostack-controller:~# cinder list
+--------------------------------------+-----------+--------------+------+-------------+----------+-------------+
|                  ID                  |   Status  | Display Name | Size | Volume Type | Bootable | Attached to |
+--------------------------------------+-----------+--------------+------+-------------+----------+-------------+
| d137be6f-7c40-447c-8106-30d0ff8d9a20 | available |   volume1    |  1   |     None    |  false   |             |
+--------------------------------------+-----------+--------------+------+-------------+----------+-------------+

root@ostack-controller:~# nova volume-show volume1
+--------------------------------+--------------------------------------+
| Property                       | Value                                |
+--------------------------------+--------------------------------------+
| attachments                    | []                                   |
| availability_zone              | nova                                 |
| bootable                       | false                                |
| created_at                     | 2014-09-17T02:45:06.000000           |
| display_description            | -                                    |
| display_name                   | volume1                              |
| encrypted                      | False                                |
| id                             | d137be6f-7c40-447c-8106-30d0ff8d9a20 |
| metadata                       | {}                                   |
| os-vol-host-attr:host          | ostack-cinder-volume1                |
| os-vol-mig-status-attr:migstat | -                                    |
| os-vol-mig-status-attr:name_id | -                                    |
| os-vol-tenant-attr:tenant_id   | 4b53dc514f0a4f6bbfd89eac63f7b206     |
| size                           | 1                                    |
| snapshot_id                    | -                                    |
| source_volid                   | -                                    |
| status                         | available                            |
| volume_type                    | None                                 |
+--------------------------------+--------------------------------------+
Launch an instance
First, create a keypair we are going to use to login to the instance:
root@ostack-controller:~# ssh-keygen -t rsa -b 2048 -f ~/.ssh/id_rsa -N ''
Generating public/private rsa key pair.
Created directory '/root/.ssh'.
Your identification has been saved in /root/.ssh/id_rsa.
Your public key has been saved in /root/.ssh/id_rsa.pub.
The key fingerprint is:
01:7e:8d:38:f7:cf:5f:22:f6:ea:b4:71:c3:2a:76:b5 root@ostack-controller
The key's randomart image is:
+--[ RSA 2048]----+
|      .          |
|     . o o       |
|      + = .      |
|       + o       |
|        S .      |
|           o ..  |
|            B.=..|
|          oo.OE+ |
|         . +=.o  |
+-----------------+

root@ostack-controller:~# nova keypair-add --pub_key ~/.ssh/id_rsa.pub key1
root@ostack-controller:~# nova keypair-list
+------+-------------------------------------------------+
| Name | Fingerprint                                     |
+------+-------------------------------------------------+
| key1 | 01:7e:8d:38:f7:cf:5f:22:f6:ea:b4:71:c3:2a:76:b5 |
+------+-------------------------------------------------+
Next, create and launch the instance:
root@ostack-controller:~# nova boot --poll --flavor 1 --image a25d69b3-623a-40c6-aca3-00f1233295ea --security-groups default --key-name key1 --nic net-id=2322ae02-88a9-4daa-898d-1c4c0b2653ca Cirros01
+--------------------------------------+------------------------------------------------------------+
| Property                             | Value                                                      |
+--------------------------------------+------------------------------------------------------------+
| OS-DCF:diskConfig                    | MANUAL                                                     |
| OS-EXT-AZ:availability_zone          | nova                                                       |
| OS-EXT-SRV-ATTR:host                 | -                                                          |
| OS-EXT-SRV-ATTR:hypervisor_hostname  | -                                                          |
| OS-EXT-SRV-ATTR:instance_name        | instance-00000003                                          |
| OS-EXT-STS:power_state               | 0                                                          |
| OS-EXT-STS:task_state                | scheduling                                                 |
| OS-EXT-STS:vm_state                  | building                                                   |
| OS-SRV-USG:launched_at               | -                                                          |
| OS-SRV-USG:terminated_at             | -                                                          |
| accessIPv4                           |                                                            |
| accessIPv6                           |                                                            |
| adminPass                            | pRiYGsBiTR9s                                               |
| config_drive                         |                                                            |
| created                              | 2014-09-17T11:37:18Z                                       |
| flavor                               | m1.tiny (1)                                                |
| hostId                               |                                                            |
| id                                   | e4703509-eab2-45d0-9ab9-f3362448da21                       |
| image                                | CirrOS-0.3.1-x86_64 (a25d69b3-623a-40c6-aca3-00f1233295ea) |
| key_name                             | key1                                                       |
| metadata                             | {}                                                         |
| name                                 | Cirros01                                                   |
| os-extended-volumes:volumes_attached | []                                                         |
| progress                             | 0                                                          |
| security_groups                      | default                                                    |
| status                               | BUILD                                                      |
| tenant_id                            | 4b53dc514f0a4f6bbfd89eac63f7b206                           |
| updated                              | 2014-09-17T11:37:19Z                                       |
| user_id                              | d6145ea56cc54bb4aa2b2b4a1c7ae6bb                           |
+--------------------------------------+------------------------------------------------------------+
Server building... 100% complete
Finished

root@ostack-controller:~# nova list
+--------------------------------------+----------+--------+------------+-------------+-------------------+
| ID                                   | Name     | Status | Task State | Power State | Networks          |
+--------------------------------------+----------+--------+------------+-------------+-------------------+
| e4703509-eab2-45d0-9ab9-f3362448da21 | Cirros01 | ACTIVE | -          | Running     | demo-net=10.0.0.3 |
+--------------------------------------+----------+--------+------------+-------------+-------------------+
To give instance specific IP we can do:
$ neutron port-create --fixed-ip subnet_id=SUBNET_ID,ip_address=IP_ADDRESS NET_ID
$ nova boot --image IMAGE --flavor FLAVOR --nic port-id=PORT_ID VM_NAME
Create security group for the instance:
root@ostack-controller:~# nova secgroup-add-rule default tcp 22 22 0.0.0.0/0
+-------------+-----------+---------+-----------+--------------+
| IP Protocol | From Port | To Port | IP Range  | Source Group |
+-------------+-----------+---------+-----------+--------------+
| tcp         | 22        | 22      | 0.0.0.0/0 |              |
+-------------+-----------+---------+-----------+--------------+

root@ostack-controller:~# nova secgroup-add-rule default icmp -1 -1 0.0.0.0/0
+-------------+-----------+---------+-----------+--------------+
| IP Protocol | From Port | To Port | IP Range  | Source Group |
+-------------+-----------+---------+-----------+--------------+
| icmp        | -1        | -1      | 0.0.0.0/0 |              |
+-------------+-----------+---------+-----------+--------------+
Give the instance a public ip so we can connect to it. First create a floating ip:
root@ostack-controller:~# neutron floatingip-create ext-net
Created a new floatingip:
+---------------------+--------------------------------------+
| Field               | Value                                |
+---------------------+--------------------------------------+
| fixed_ip_address    |                                      |
| floating_ip_address | 192.168.144.3                        |
| floating_network_id | 4d584b71-1b3a-46a5-b32a-7fd2ba3e2535 |
| id                  | 44a4b23c-1345-4dcb-b286-a2759246cdb4 |
| port_id             |                                      |
| router_id           |                                      |
| status              | DOWN                                 |
| tenant_id           | 4b53dc514f0a4f6bbfd89eac63f7b206     |
+---------------------+--------------------------------------+

root@ostack-controller:~# nova list
+--------------------------------------+----------+--------+------------+-------------+-------------------+
| ID                                   | Name     | Status | Task State | Power State | Networks          |
+--------------------------------------+----------+--------+------------+-------------+-------------------+
| e4703509-eab2-45d0-9ab9-f3362448da21 | Cirros01 | ACTIVE | -          | Running     | demo-net=10.0.0.3 |
+--------------------------------------+----------+--------+------------+-------------+-------------------+
and then associate the ip with the instance:
root@ostack-controller:~# nova floating-ip-associate Cirros01 192.168.144.3

root@ostack-controller:~# nova list
+--------------------------------------+----------+--------+------------+-------------+----------------------------------+
| ID                                   | Name     | Status | Task State | Power State | Networks                         |
+--------------------------------------+----------+--------+------------+-------------+----------------------------------+
| e4703509-eab2-45d0-9ab9-f3362448da21 | Cirros01 | ACTIVE | -          | Running     | demo-net=10.0.0.3, 192.168.144.3 |
+--------------------------------------+----------+--------+------------+-------------+----------------------------------+
Now using the ssh key we created before and the public (floating) IP we attached we can connect to it from outside (the hypervisor):
root@ostack-controller:~# ssh cirros@192.168.144.3
Booting from image volumes stored in CEPH
First the image stored needs to be in RAW format.
root@ostack-controller:~# wget http://download.cirros-cloud.net/0.3.4/cirros-0.3.4-x86_64-disk.img
root@ostack-controller:~# qemu-img convert -f qcow2 -O raw cirros-0.3.4-x86_64-disk.img cirros-0.3.4-x86_64-disk.raw
root@ostack-controller:~# glance image-create --name CirrOS-0.3.4-x86_64_raw --is-public=true --disk-format=raw --container-format=bare < cirros-0.3.4-x86_64-disk.raw
+------------------+--------------------------------------+
| Property         | Value                                |
+------------------+--------------------------------------+
| checksum         | 56730d3091a764d5f8b38feeef0bfcef     |
| container_format | bare                                 |
| created_at       | 2016-02-16T01:18:00                  |
| deleted          | False                                |
| deleted_at       | None                                 |
| disk_format      | raw                                  |
| id               | 147c22d8-2d32-4042-8f74-740f40112052 |
| is_public        | True                                 |
| min_disk         | 0                                    |
| min_ram          | 0                                    |
| name             | CirrOS-0.3.4-x86_64_raw              |
| owner            | 4b53dc514f0a4f6bbfd89eac63f7b206     |
| protected        | False                                |
| size             | 41126400                             |
| status           | active                               |
| updated_at       | 2016-02-16T01:18:16                  |
| virtual_size     | None                                 |
+------------------+--------------------------------------+
root@ostack-controller:~# glance image-list
+--------------------------------------+-----------------------------+-------------+------------------+-----------+--------+
| ID                                   | Name                        | Disk Format | Container Format | Size      | Status |
+--------------------------------------+-----------------------------+-------------+------------------+-----------+--------+
| a25d69b3-623a-40c6-aca3-00f1233295ea | CirrOS-0.3.1-x86_64         | qcow2       | bare             | 13147648  | active |
| 398ecc61-2b38-47e9-972b-1b2a760aa3c7 | CirrOS-0.3.2-x86_64         | qcow2       | bare             | 13167616  | active |
| df438372-414c-46fe-910f-22fdb78cecb8 | CirrOS-0.3.3-x86_64         | qcow2       | bare             | 13200896  | active |
| 147c22d8-2d32-4042-8f74-740f40112052 | CirrOS-0.3.4-x86_64_raw     | raw         | bare             | 41126400  | active |
| e871958c-8bbd-42ec-ad16-31959949a43c | Ubuntu 12.04 cloudimg amd64 | qcow2       | ovf              | 261095936 | active |
+--------------------------------------+-----------------------------+-------------+------------------+-----------+--------+
We can also see the used store size has increased in Ceph:
igorc@ostack-ceph1:~$ ceph -s
    cluster 5f1b2264-ab6d-43c3-af6c-3062e707a623
     health HEALTH_WARN
            too many PGs per OSD (320 > max 300)
     monmap e1: 3 mons at {ostack-ceph1=192.168.122.211:6789/0,ostack-ceph2=192.168.122.212:6789/0,ostack-ceph3=192.168.122.213:6789/0}
            election epoch 38, quorum 0,1,2 ostack-ceph1,ostack-ceph2,ostack-ceph3
     mdsmap e23: 1/1/1 up {0=ostack-ceph1=up:active}
     osdmap e55: 3 osds: 3 up, 3 in
      pgmap v10010: 320 pgs, 5 pools, 40164 kB data, 31 objects
            228 MB used, 22778 MB / 23006 MB avail
                 320 active+clean
and both the datastore (cinder) and images (glance) pools have objects inside:
igorc@ostack-ceph1:~$ rbd -p images ls
147c22d8-2d32-4042-8f74-740f40112052

igorc@ostack-ceph1:~$ rbd -p datastore ls
volume-4ca5327e-e839-4742-81db-77f8fe9ba5a0
Now if we create a volume from this image:
root@ostack-controller:~# cinder create --image-id 147c22d8-2d32-4042-8f74-740f40112052 --display-name cephVolume1 4
+---------------------+--------------------------------------+
|       Property      |                Value                 |
+---------------------+--------------------------------------+
|     attachments     |                  []                  |
|  availability_zone  |                 nova                 |
|       bootable      |                false                 |
|      created_at     |      2016-02-16T01:25:28.514010      |
| display_description |                 None                 |
|     display_name    |             cephVolume1              |
|      encrypted      |                False                 |
|          id         | 1e8dd895-6987-4ca0-aab1-f583a6e0740c |
|       image_id      | 147c22d8-2d32-4042-8f74-740f40112052 |
|       metadata      |                  {}                  |
|         size        |                  4                   |
|     snapshot_id     |                 None                 |
|     source_volid    |                 None                 |
|        status       |               creating               |
|     volume_type     |                 None                 |
+---------------------+--------------------------------------+
Then we need to enable Nova and libvirt to work with CEPH storage. Since we use authentication in ceph we need to create auth secret in libvirt on the compute node. We will use the existing datastore ceph user we created before in ceph.
root@ostack-compute:~# uuidgen
1c5a669e-980f-4721-9f31-8103551c917c

root@ostack-compute:~# vi secret.xml
<secret ephemeral='no' private='no'>
  <uuid>1c5a669e-980f-4721-9f31-8103551c917c</uuid>
  <usage type='ceph'>
    <name>client.datastore secret</name>
  </usage>
</secret>

root@ostack-compute:~# virsh secret-define --file secret.xml
Secret 1c5a669e-980f-4721-9f31-8103551c917c created
We get the datastore user’s key from one of the ceph cluster nodes:
igorc@ostack-ceph1:~$ ceph auth get-key client.datastore
AQA3SuRVuaeGAxAAPHAFDfT2gX8iNIj1QWfQkA==
and create the libvirt secret:
root@ostack-compute:~# virsh secret-set-value --secret 1c5a669e-980f-4721-9f31-8103551c917c --base64 AQA3SuRVuaeGAxAAPHAFDfT2gX8iNIj1QWfQkA==
Secret value set
Now we enable Nova to work with Ceph volumes (rbd storage driver):
root@ostack-compute:~# vi /etc/nova/nova.conf
[DEFAULT]
...
## CEPH VOLUMES ##
libvirt_images_type=rbd
libvirt_images_rbd_pool=datastore
libvirt_images_rbd_ceph_conf=/etc/ceph/ceph.conf
rbd_user=datastore
rbd_secret_uuid=1c5a669e-980f-4721-9f31-8103551c917c
libvirt_inject_password=false
libvirt_inject_key=false
libvirt_inject_partition=-2
Confirm the file /etc/ceph/ceph.conf exists and restart the compute service:
root@ostack-compute:~# service nova-compute restart
After this we can go to the GUI and launch new Cirros m1.small instance (we can’t use m1.tiny since this flavor supports 1GB volumes only and ours is 4GB) and
choose boot from volume option:
Instance boot source: Boot from volume
Volume: cephVolume1 - 4GB (volume)

Leave a Comment